Table of Contents
Setting Up EF 1 Game Servers
Via the GUI
Above a lot is written about maps and their selection for servers. Here is a bit more about how to create a game server. Since the solo match (single player) is only a special case of the multi match (multiplayer), there are no separate explanations on that. For a LAN server there are basically two alternatives: Either you open a so-called “dedicated server”, or you open a so-called “list server”. There are again two methods for the fromer: Either you use an extra program for it (which usually has better configuration possibilities for dedicated servers), or you use EF itself for it. Since there are many programs for it, I will only explain how to do this with EF itself. After all, everyone has that. But if one of you still wants to use a program for it, I can recommend the EF-Runner. But I won't explain it here additionally. It then creates the necessary config files, if necessary for several servers.
- The menu path is as follows: Multi Match → Create Server
So from this menu:
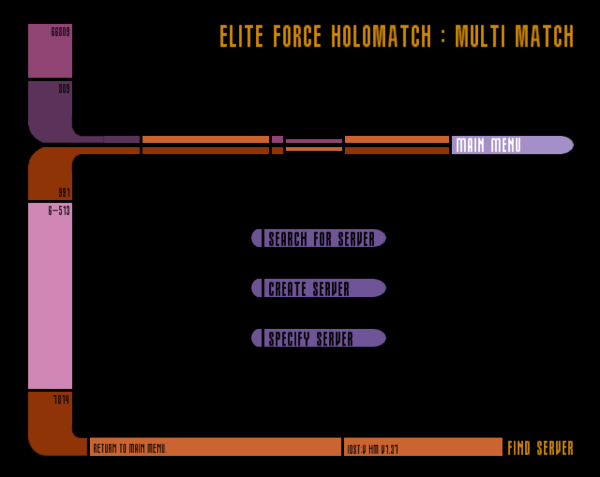
You end up here:
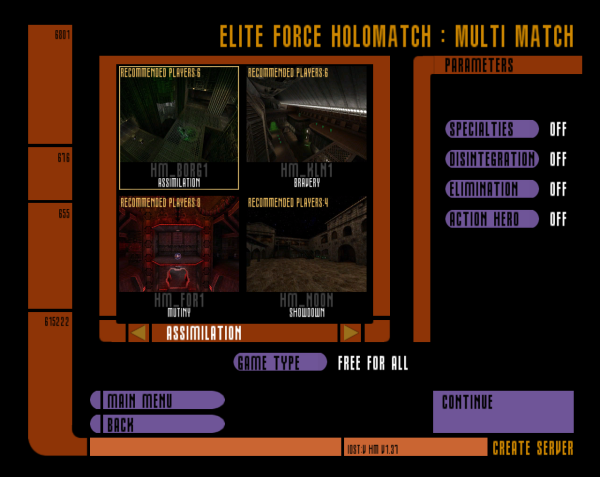
- Select game type:
- Free for all (FFA = DM)
- Team Holomatch (TDM)
- Tournament (1 on 1) (not necessarily available on the GUI)
- Capture the Flag (CTF)
- Select a map (this is the first one, i.e. the one that will be played directly at the beginning, and is played over and over until someone successfully calls for a vote for another map)
- Select modes if necessary (Elimination, Specialist, Action Hero, Disintegration, Assimilation). Not all combinations of mode and game type are possible. For example, assimilation requires team deathmatch as game type.
- Click on Continue. You will enter this menu:
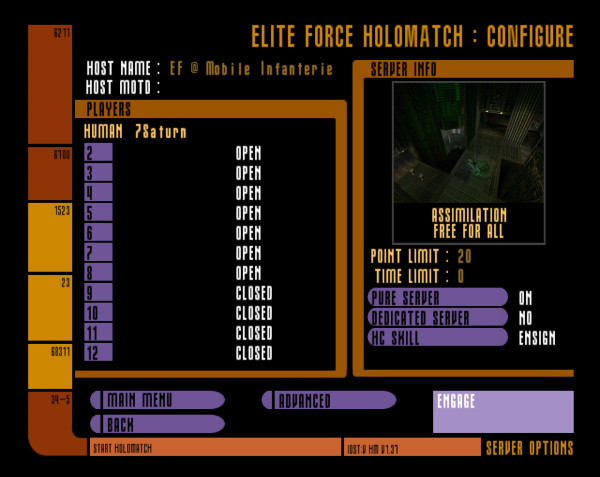
- Enter the Host name: The others will see this name in the list when searching for servers.
- In the field Human below Players you may change your own name if you haven't done so yet. (This does not exist, of course, if you start the server as Dedicated Server.)
- Select how many open slots or how many slots occupied by bots should be available.
- HC skill: Level of difficulty of the bots, where Cadet is the easiest ranging to Captain being the most difficult level.
- Set Point Limit and Time limit
- Define Server: The Pure Server option is not the dedicated function, but a security function that does the following: If it is on, the server checks whether the client (= player) really has exactly the same files as on the server (
sv_pure=1). This means, for example, that a player cannot cheat with modified*.pk3files. But normally you don't need it on LANs. But that's sometimes the reason why you shouldn't change the original*.pk3files, or recompress them again, or something like that. The file may not be usable afterwards… - Under Dedicated Server you have three options:
- NO (= No dedicated server, so = list server)
- LAN (only players from the local network may join the server)
- INTERNET (People from the Internet may also join, not recommended on LANs)
- Set Advanced settings if necessary:
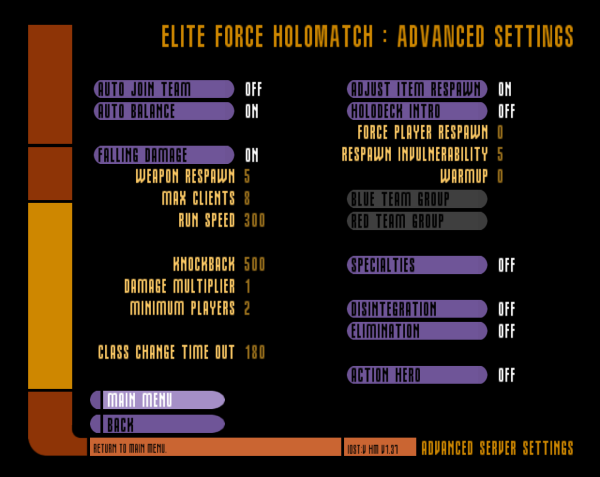
- Auto join team: Does the server put a connecting player into a team automatically?
- Auto balance: Does the server rebalance the teams, if a team has more players than the other?
- Falling Damage: Will a player suffer damage, when falling off from a heightened position?
- Weapon respawn: Number of seconds after picked up weapons will reappear on their pick up spot.
- Max clients: The maximum number of players that are allowed to connect to the server at the same time.
- Run speed: How fast players can walk.
- Knockback: How powerful are pushing effects like explosions?
- Damage mulitplier: You can increase the damage dealt by any weapon with this factor.
- Minimum players: If there are not enough human players per team, the server automatically fills it wit bots until the number of players has been reached. In teamless modes, the number counts for all players on that server.
- Class change timeout: Number of seconds a player has to wait, until he can change his class in specialties mode. This also counts from the first joining of he match, where you automatically have class assigned.
- Adjust item respawn:
- Holodeck intro: A small intro, that is played just before actually entering the match.
- Force player respawn: Players cannot stay in score screen suspension after being fragged indefiniteley, when turned on.
- Respawn invulnerability: The number of seconds during which a fragged and rejoined player cannot be hit.
- Warmup: Number of seconds a warm up period is applied before the actual match begins.
- Blue team group: Selection of what kind models will be used for blue team's bots. Possible values:
- None,
- Female,
- Proton,
- Male,
- Starfleet,
- Borg,
- BorgFemale,
- BorgMale,
- Aliens,
- HazardTeam,
- Klingons and
- Romulans.
- Red team group: Same as for Blue.
- Specialties: Do players have special classes like sniper or infiltrator?
- Desintegration: One hit instantly kills.
- Eliminiation: Fragged players stay out of the match until another round starts.
- Action Hero: One player get's all weapons of the game and starting ammunition, has a maximum or 300 health, constantly replenished. Fragging the hero makes a player the hero himself and getting 5 points. Normal frags give 1 point.
To use a dedicated server on your own computer and play on it parallel, you would have to start another instance of Elite Force to connect to the server. However, since this requires a fast computer, so that it doesn't cause any problems, it is recommended to use a computer that has the service running, or if none at hand, to start a list server. And the dedicated server created in EF has another limitation: You can only run one map at a time (or use voting), unless you know a bit about scripting (but that goes too far here). Programs like the EF-Runner can also create a mapcycle without any problems and this very comfortable.
Via Config File
There are basically two ways to automatically start servers without having to click through menus. One runs via a start script, i.e. under Windows a *.bat file, under Linux a shell script or a Systemd Unit. Or you simply start the server and provide the config file via the exec command. Both cases use a server configuration file, which tells the server what it has to look like and what it has to do. By default, the EF server will not run any map or match. You can enter map your map name in the console that will appear after starting the server or start a config manually with exec your config file. But for dedicated servers this is not recommended. Before you have a map running, the server is not accessible from the outside, so not even rcon access is possible. So for testing purposes this may work, but not for stand alone use or even automated starting with the system.
Creating an Installation for an EF Server
The basis for all this is the dedicated server, which nowadays will be mostly custom software. Under Windows it's pretty easy: Just use a normal EF installation but expanded with an up-to-date version for the dedicated server binaries, see Versions on the matter. If you want to set up a bare server, you don't need all of your EF installation files. You only need the directory BaseEF from the CD, which you have to rename to baseEF under Linux. Otherwise the server won't find its files. In addition, there is the stvoyHM.exe, or better (because more secure), a corresponding dedicated server binary, which is not to be placed in baseEF, but one level higher. Examples would be liliumvoyded.x86_64 (Lilium Voyager x64 under Linux) or cmod_dedicated.x86.exe (cMod x86 under Windows). In order to run the dedicated server under Linux, you might need to make the dedicated server binary executable, before you can run it.
So for example Lilium Voyager under Linux would require a file and a folder to be suitable as an EF dedicated server, e.g.:
- baseEF and
- liliumvoyhm.x86_64.
For Windows the binary would be named liliumvoyded.x86_64.exe. Inside the folder baseEF you should find at least the following files:
- pak0.pk3
- pak1.pk3
- pak2.pk3
- pak3.pk3
You may also extend that folder with your own maps, models, and so on. Just be aware: A player will download those files, if needed, unless either the server or the client forbids it. So if you add custom content, make sure a player has some convenient means to get those contents (e.g. map downloads on or a map package of sorts).
So the final folder structure should look somewhat like this:
- ef_server/liliumvoyhm.x86_64
- ef_server/baseEF/pak0.pk3
- ef_server/baseEF/pak1.pk3
- ef_server/baseEF/pak2.pk3
- ef_server/baseEF/pak3.pk3
Creating a Config
For the server to do something customized to your needs, you will have to create a new text file with .cfg extension in the baseEF folder. In principle, the name for the config doesn't matter. However, when named autoexec.cfg the config is loaded automatically during start-up and map running. This special config file is used always. It might contain default definitions (e.g. having the same rcon password for all servers or turning off bot chat). A minimal server config could look like this:
seta hostname "My Server"
seta sv_maxclients "32"
seta fraglimit "30"
seta timelimit "15"
seta capturelimit "5"
seta g_friendlyfire "1"
map hm_voy1
echo "Runs!"
status
A slightly extended config could look like this :
For a mapcycle, as shown in the second example, you have to define manually which map should be loaded after the current one and at restarting the cycle at the end. You can also set the mode for the current map and other settings that should change when changing maps. This way you can switch between CTF and DM, depending on the map. There is one drawback of this method: You really should turn off the voting system. Otherwise, some player may make the server “take another turn”, essentially leaving the map cycle. You can continue it, by issuing /rcon vstr name, to continue with the section named name. But especially on dedicated servers running 24/7, the more elegant way is to turn of voting altogether.
Important: If you use command such as vstr or map, or in general, all commands other than set derivatives, you must write protect your config. EF will overwrite the config after using it, stripping it of any of these commands. So you would end up with pure, uncommented settings, possibly even destroying your work.
Placing Files Properly
Config files have to be stored in folder baseEF, even if you want to start the dedicated with active mods. The server initially searches for its files there, including the maps, before it starts. Under Linux some dedicated servers search in the folder ~/.stvef/baseEF resp. ~/.local/share/lilium-voyager/baseEF. So it may also depend on the user you run the server as, where it will actually be searching for its files.
When done, you should end up with a file like this:
- ef_server/baseEF/my_super_duper_config.cfg
Or maybe like this:
- /home/your_user_name/.local/share/lilium-voyager/baseEF/my_super_duper_config.cfg
For further settings in the config, see the Config Parameters.
Loading/Running a Config
In essence, once you have created your installation and a configuration file, you need the EF dedicated server to run and loading it.
In order to actually use a specific config, you have to state that to the dedicated server binary of EF during running it (or starting it manually, once the server already runs).
The manual specification of a config file to load during start-up can look like this:
"C:\Program Files\Raven\Star Trek Voyager Elite Force\stvoyHM.exe" +seta dedicated 2 +seta sv_pure 0 +exec my_config.cfg
This command can either be put into a Windows shortcut as a start command (the path in which the program is to be executed must be adapted accordingly), or into the starting batch file. There is not much more to do with an EF installation under Windows. For Linux, the case looks like this:
./binaryname +seta dedicated 2 +seta sv_pure 0 +exec my_config.cfg
Run from the directory where the EF server is located. You can of course use the full path of the binary as well.
+seta dedicated 2 makes the server appear on master servers, if your port-forwarding allows for remote access (see section Accessibility on more details). The +seta sv_pure 0 turns of the pure setting. You can also turn that on, with 1 instead of 0. +exec my_config.cfg makes the dedicated server do the actual config loading. There are a number of other parameters you might want to use, but these are probably the most important ones for basic server operations.
If you don't want to start a dedicated server with standard EF but with a mod active, you have to pass this to the server at start-up, e.g. for Pinball by adding +set fs_game pinball. For the use of mods the specification fs_game might be absolutely necessary as start start parameter (not to be set in the config, that's too late to be found). The name of the mod normally corresponds with the name of directory in which the mod data is stored. This will also be the location where the game will be looking for its config files. You could say that for standard EF the mod folder is baseEF. But it doesn't have to be specified separately, because the data is searched for in this directory by default.
Game Types and Modes
A Game Type is kind of the base variation of the game (e.g. team play vs. each player on their own), while a Mode varies a Game Type (e.g. with special classes or one player having a special role).
Here is a brief overview of which game types and which modes belong to which config variables:
| Game Type | g_gametype |
|---|---|
| Free for all (DM) | 0 |
| Tournament | 1 |
| Solo* | 2 |
| Team Deathmatch | 3 |
| Capture the Flag | 4 |
If other numbers are used, the game mode is set to FFA.
* Note: Solo is only here for the sake of completeness and is not actually a game type for servers. This mode is set when starting a solo match via GUI in Elite Force, i.e. without other human players. In principle this mode can also be used via console parameters or in a config, but then it is not possible for other players to join the game. Accordingly, it cannot be reached via network (not even via stating localhost / 127.0.0.1).
| Mode | Variable |
|---|---|
| Assimilation | g_pModAssimilation = "1" |
| Elimination | g_pModElimination = "1" |
| Specialties | g_pModSpecialties = "1" |
| Action Hero | g_pModActionHero = "1" |
| Disintegration | g_pDisintegration = "1" |
Permitted Combinations of Game Type and Mode
Not all combinations of game type and mode are allowed. Below is an overview of which combinations of modes are allowed with game types and with modes among each other.
Game Type and Mode
| Game Type | Assimilation | Specialties | Disintegration | Elimination | Action Hero |
|---|---|---|---|---|---|
| Free for all | no | yes | yes | yes | yes |
| Team Deathmatch | yes | yes | yes | yes | no |
| Tournament | no | yes | yes | yes | yes |
| Capture the flag | no | yes | yes | no | no |
Modes With Each Other
| Assimilation | Specialties | Disintegration | Elimination | Action Hero | |
|---|---|---|---|---|---|
| Assimilation | yes | yes | no | no | no |
| Specialties | yes | yes | no | yes | no |
| Disintegration | no | no | yes | yes | no |
| Elimination | no | yes | yes | yes | no |
| Action Hero | no | no | no | no | yes |
Assimilation Mode Full Server Bug
Bots Filling Up the Server
Beware of a glitch that comes around when using bot_minplayers > 0 in conjunction with g_pModAssimilation = 1. When certain game event orders occur, the server gets filled up with bots, up to the point where nobody can join it any longer (not even reserved slots are free). To understand this, keep the following things in mind:
- bot_minplayers adds a new bot, whenever one team is dropping below the number of players defined by it.
- In Assimilation mode after a short while you cannot join either team any longer but are forced to spectate (= being part of no team, or the pseudo-team spectator).
- Whenever Borg assimilate a player from the Starfleet team, the player gets re-assigned to the Borg team, leaving the Starfleet team one player shorter than before. (And the Borg team one player bigger.)
So for the Assimilation mode a team falling below the value of bot_minplayers is normal operations for the Starfleet team. This also means, unless bot_minplayers is set to zero or the Borg queen gets killed before that happens, the Starfleet team will drop below the bot_minplayers value at some point. What happens then is, the game will – as usual – try to add a new bot to the Starfleet team, to compensate the lack of players.
This however will fail, if the timeout for joining a team has already hit. In turn, the new bot will be re-assigned to the spectator-non-team – leaving the Starfleet team one player short, still. So the game will again add another player to team Starfleet, starting the circle anew. This goes on until the server is stacked full with players and/or bots. The bad thing about this is, this also uses up reserved slots, making it impossible for anybody to join the server, as it will be full after this cycle of death hit.
Here is a video showing that phenomenon: https://www.youtube.com/watch?v=No1yFRQb-04
Preventing the Problem
In order to get around this problem, whenever playing Assimilation, make sure to set bot_minplayers to 0. This of course means, by default, no bots will populate the server. This however, can be achieved manually with help of the following commands:
addbot <name> <level> <team>: Adds a bot of given level to the given team. The name is mandatory. The other values are optional. <team> should be eitherborgorstarfleet. You could also use the regularblueandredvalues. But then the assignment of the bots to Borg or Starfleet team may be random, as the Borg teams may be chosen to be red or blue, and Starfleet the according opposite. <level> should be between 1 and 5. The default is 3.kickbots: This kicks all bots from the server. This is particularly useful, when you work from within a mapcycle, that used bot_minplayers before, so the server is already filled with bots. First kick all bots, then re-add the ones you want to have.
Example:
set bot_minplayers = 0; kickbots; addbot 2_of_3 3 borg; addbot wortsla 3 starfleet;
This fills the server with one player for each team.
Accessibility
When creating an EF 1 game server yourself, you only need to open port 27960 (UDP) in a firewall (or alternatively the port you have chosen yourself). You don't have to select a specific port to join, just as long as NAT forwarding and/or firewall allow for it to be use. However, you have to distinguish between LAN server and Internet server when creating the server. LAN servers are, as the term implies, only accessible via LAN, not via the Internet. In principle you can also run multiple servers by using different ports for the different servers. Some ports can be found automatically by EF, so that even a second or third game server running in parallel does not have to be entered manually in EF. The automatically scanned UDP ports for LAN search are 27960-27963.
IPv6
If you are hosting a match on a computer with an IPv6 address, the game also waits for connections via your IPv6 stack, when using Lilium Voyager or cmod. If a player decides to connect to that server via IPv6, he has to enter the address in the fashion [block1:block2:…:blockn] into the Specify Server fields. Notice the brackets around, they are required. The :: abbreviations are also allowed. The following two cvars may be of particular interest in this case:
net_enabled: Determines, which protocols EF is actually using. You can add (sum!) the following values for their effect:
1: enables IPv42: enable IPv64: prioritizes IPv6 over IPv48: disables IPv6 multicast support
Example: to simply activate IPv4 and IPv6, use set net_enabled 3 (= 1 + 2).
net_port6: The UDP port to be used for the IPv6 protocol the server will listen on.